Changing Strings on your Upright Bass
You’d think the job would be pretty straightforward-- however, there are things you can do that will make the job a bigger success -- please read all of these tips first, as an overview for the best results and least risk to strings & bass!!
- Change one string at a time. If you remove all the strings and relieve the pressure on the top of the bass, the sound post (wooden dowel under the G-side bridge foot spanning front to back) can fall. It’s held in only by the pressure of the bridge against the top of the bass. A good precaution, under any circumstance, is to tape a pencil to a stick and draw a circle around your current sound post position (assuming you’re happy with your bass’ sound), in case of accidental bridge collapse during transport. That will make returning the sound post to the preferred position easier. If it does drop out of place, we have a tool that can help ease the re-install process.
- Loosen the first string... Once it is loose around the post you can usually grab and disengage the section going through the hole using a pair of long nose pliers, which then allows you to pull the string out without a lot of machine turns.
- Inspect string routing in the pegbox (aka headstock) before you start to change them. It’s a good idea not to have strings rubbing against each other as you tune, so check to see how they are currently wound around the string roller and routed through the pegbox so you can imitate or correct placement. It’s also a good time for housecleaning: a vacuum, cloth rag, q-tips, and other tools are good for removing dust and debris.
- Check bridge and nut “slots” as you change each string. They should be indents, never deeper than half the diameter of the string; deep slots can pinch a string, dampening true pitch, harmonics, and sustain. A too-deep slot can even possibly snag the windings as you tune and break the string! You may want to use a small rat-tail file (or folded sandpaper) to round them to better accommodate the string's diameter, if the new strings are larger than the old ones. In most cases, you'll want to try to WIDEN the slot WITHOUT deepening the slot - meaning, take away material from the sides of the slots without digging down to make the slot deeper. Also, be sure the surface is smooth and there is a smooth path angling down from both sides of the bridge - that indent should be a very smooth path for the string at both bridge and nut. If the nut slots are too wide and cause buzz, a quickie emergency fix can be made by laying a little gel formula super glue (let it fully cure before re-stringing!) in there to fill the gap and narrow the string path.
- Lubricate the indents. You can use some pencil lead (graphite) to act as a lubricant - you really don't want the strings' metal wrap to catch on the bridge or nut and ruin the string.
- Insert the string end into the roller. The weight and stiffness of the string can dictate how you fasten it. If light, you can twist the end of the string around the part exiting the roller a couple times, otherwise having the string cross over the end, holding it in place, can do the job. Neat winds are nice although not always necessary; I use a string winder that fits into my electric screwdriver so I have a free hand to guide the string neatly onto the roller; you’ll get the best results if you keep tension on the string as you wind. Be sure not to wind the string on the roller so the string ends up rubbing against the inside wall of the pegbox! Cross over and start winding the other way to avoid this... and keep in mind where you want the string to end up (see string routing point above).
- IMPORTANT! Watch and correct the bridge’s attitude, now and in the future. As you tune up, the strings can have a tendency to pull the top of the bridge towards the fingerboard -- keep an eye on it, as that pull will eventually warp the bridge and possibly cause it to collapse. This happens not just at changing time, but each time you tune! I used to give the top of my bridge a gentle karate chop to put it back into a perfectly perpendicular position. Now that I am older, wiser, and more susceptible to pain, I use the spine of a bad paperback book.
- Don’t remove and reinstall strings if you can help it. Many double bass strings are often made of a variety of materials, and almost all do not take kindly to being twisted, which can result in breakage or poor sound. If you must reinstall a string, let it lay naturally and don’t fight where it wants to go; twist the entire string from the tailpiece end if it’s not laying naturally.
- Patience, Grasshopper. Strings can take a while to stretch, especially gut and synthetic/perlon core types (3+ days!), so it may not be a good idea to change strings Friday night for a Saturday gig. Give them time, play them in, so they gradually acclimate to your bass.
- Bass buzzes and rattles can be elusive, but I’ve often found them to originate from loose string ends vibrating against each other or against the headstock. If one develops, that’s one of the first places to look!
You'll find detailed descriptions of the strings I sell on each of their respective pages - and we also have "Buyer's Guides" for specific styles and techniques, to help choose a string that meets your needs and taste. String gauges are also shown. I hope you find this and that information helpful.
A quick plug for a tool I find very useful ...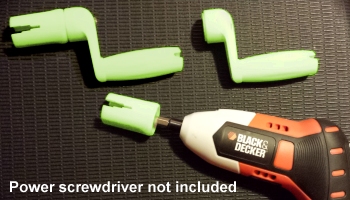
Having broken several plastic bass machine cranks and screwdriver inserts, I found the Turbo Tuner. As you can see, the crank separates from the business end of the unit so you can exercise your electric screwdriver instead of your hands. It has the added advantage of enabling one-hand, more controlled winding, because you can use your other hand to better guide the string onto the roller. The head is approx. 7/8 inch across, and it will not just handle upright bass machines but also bass guitar and even mandolin!