Tailgut (tailpiece hanger): Replacing with Stranded Cable
I've had a number of people ask about tailgut replacement cable, so here's a quick and dirty page to show some photos of my simple (and frugal, as usual) solution.
Here's the stock text I use in email responses when folks ask me about replacing their tailgut with a stranded steel cable: A popular solution is to replace solid wires and other tailguts with aircraft cable. There are fancy kits available with special fasteners, but you can pick up a short piece of good quality cable at a hardware store, along with a cable clamp or two, and use that as your replacement tailgut. (One of our customers has recommended a type of clamp called a "Tiller Clamp" - do a search - that might be a good option for clamping). That's exactly what I did with my Kay. I used black shrinkwrap in the front section where it shows, to make it prettier, and also on the cable ends, to keep it from snagging on my case or fingers.
Aircraft cable has two advantages, one, its flexibility is good for the bass, and two, it can't just suddenly snap like a solid wire can.

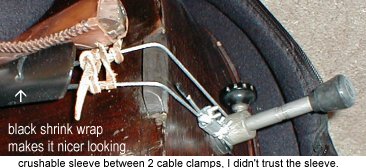
Here on the website, for clarity I can add the following photographs and descriptions. In this first photo, you can see my Kay bass with the replacement "tailgut" of aicraft cable. The cable came with a compression crimp device to hold the ends together; quite frankly, I didn't feel confident with it alone, so I also put a pair of cable clamps on each side for a little extra security.
I also slid a small piece of black shrink-wrap tubing onto the cable, to cover the silver-colored wire where it shows on the front of the Kay tailpiece; it makes the new cable blend in with its surroundings much better.

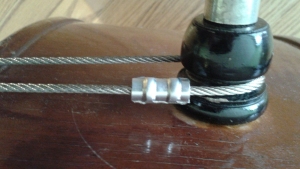
Our customer Dean pointed out that using a proper crimping tool, cutting the cable to length before crimping, makes for a very clean, secure job; crimp first in the center, then once on each side, for a really secure fit -- and no exposed wire ends to cover! You can see his very nice job in the photo to the right.

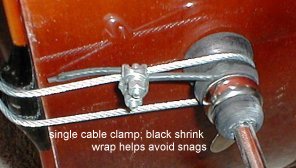
Here's a cable on a different, non-Kay bass. It's installed using a single cable clamp. Note the shrink-wrap covering the ends of the cable; since the stranded cable can fray where it's cut, this protects you from the cable starting to come apart at the ends - as well as from developing little pinholes in your fingers and/or bass bag. Those wire strands are tiny and sharp!

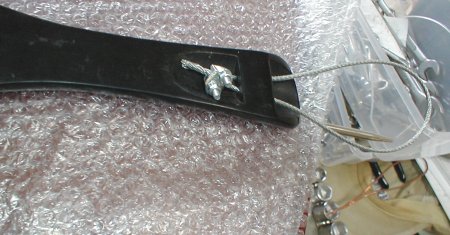
Finally, here's an alternate way to apply the cable using a nice ebony tailpiece with vertical mounting holes that are concealed from the front; with a tailpiece like this, you can put the cable clamp behind the tailpiece rather than under the bass next to the endpin. This can make for a cleaner looking installation, since the clamp is "hidden" from view.
I'd be remiss if I didn't mention that I both sell ready made steel tailgut cables, see below under "Product Associated With This FAQ". The above information can be a great way to take care of an emergency need or for those who prefer to DIY.

Here's a cable on a different, non-Kay bass. It's installed using a single cable clamp. Note the shrink-wrap covering the ends of the cable; since the stranded cable can fray where it's cut, this protects you from the cable starting to come apart at the ends - as well as from developing little pinholes in your fingers and/or bass bag. Those wire strands are tiny and sharp!

Finally, here's an alternate way to apply the cable using a nice ebony tailpiece with vertical mounting holes that are concealed from the front; with a tailpiece like this, you can put the cable clamp behind the tailpiece rather than under the bass next to the endpin. This can make for a cleaner looking installation, since the clamp is "hidden" from view.
I'd be remiss if I didn't mention that I both sell ready made steel tailgut cables, see below under "Product Associated With This FAQ". The above information can be a great way to take care of an emergency need or for those who prefer to DIY.
